Turkey!
Well, It’s the day before thanksgiving. If your bird is larger than 10 lbs and you haven’t already started thawing it out, it’s too late. Save it for Christmas and brave the store to try and get a fresh, thawed bird. A 20+ lb turkey will take several days to thaw, even if you run it under water all morning, and trying to rush it will just result in a microwave-like result with the outside cooked and the inside raw. Ideally, you should start thawing your turkey almost a week in advance, moving it from the freezer to the fridge (or somewhere safe from pests outside if its cold enough). Then, the night before (or at least a few hours before going into the oven), you should leave it out on the counter to come to room temperature. This decreases the temperature difference between the meat and the oven, resulting in a more evenly cooked bird. A little bit of planning and forethought will make the whole day so much easier and stress free.
Now that we have the turkey ready for the oven, let’s go over a few basics and turkey-cooking myths. I’m going to spend a little time debunking basting and stuffing the turkey. If you pour water over your skin, do you instantly swell up like a sponge? No. That’s because skin is primarily waterproof, it serves as a barrier to protect our body and regulate our natural processes. The same is true for a turkey’s skin. Basting serves only to have the oven repeatedly opened, letting all the heat out, resulting in a longer, uneven cook time. It’s possible that ‘basting’ came from a desire to escape that annoying relative that wouldn’t leave you alone. “Sorry I need to go baste the bird (check the grill, check the kids, whatever).” A dry turkey is NOT from basting, it is simply over-cooked.
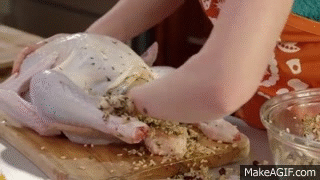
Stuffing a bird, while not necessarily “bad”, introduces a greater thermal mass, making it harder to evenly cook the entire turkey, which will now take longer to get to temperature. In other words, it’s more complicated, and I suggest not doing it until you have several successes under your belt, but it’s really up to you.
Cooking a winning turkey is really very simple, it’s much easier than most people think, but the FDA has created several misleading assumptions, preferring safety in excess over quality. Trap number one, the pop-up turkey timer. THROW IT AWAY, burn it, bury it, whatever. If that thing pops up, it’s too late. Your turkey will likely crumble, and no amount of mashed potatoes or gravy can save it. Trap number two, cooking by time. This is more of a guideline, but every oven is different. You have to cook by TEMPERATURE, don’t treat the chart on the turkey’s plastic wrap as gospel. You are just as likely to wind up with an undercooked turkey (resulting in jeers from hungry relatives as you scramble to cook it to completion), as you are to end up with over-cooked cardboard.
To cook anything by temperature, you need a meat thermometer that can be calibrated. They can be found as cheap as 5 dollars at the grocery store. Calibrated thermometers typically have a little nut between the stabber (probe) and the dial that you can use to tweak the needle on the dial. Oven-safe thermometers usually don’t read down to freezing, so set a small pot of water to boiling, then put the probe (without burning yourself) into the boiling water without touching the bottom/sides of the pot, and watch the needle until it stops moving, it should stop at 212 oF/100 oC. If it doesn’t match up, tweak that nut until it does, and re-test since the dial will have moved in the short span of time it was out of the water. For non oven-safe thermometers, perform the same process with a cup of ice-water, calibrating at 32 oF/0 oC. You now have an accurate thermometer, and can be assured that your turkey isn’t a little raw when your thermometer tells you it’s done. That would be embarrassing when you go to carve your beautiful bird.
The number shall be 165oF. Not 160oF, nor 170oF, but 165oF. This is the magic number for turkey (or any poultry really). Temperature should be taken from the center of the breast (typically the thickest part of the bird); make sure you are nice and deep, but you don’t want the tip of the probe to contact any bones, or pop through the other side into the chest cavity. When it comes to cooking the bird, you can take the low and slow method, setting your oven to 250 oF, or the quicker, standard method at 325 oF /350 oF. Most websites or authorities discourage the low and slow method for safety reasons so I won’t cover it here. Conventional wisdom states 12 to 15 minutes in a pre-heated oven at 325 oF per pound of bird. HOWEVER, recall that this is conservative. Use this approximation as a worst-case assumption for planning purposes. I cooked two turkeys two weeks ago for our company potluck and they each took closer to 8 to 9 minutes per pound.
Keeping in mind that your plan is 12-15 minutes per pound of turkey, do your first temperature check at around 1/3 to 1/2 the scheduled cook time. For a 20 lb bird, this would be after about 2 hours (remember opening the door as little as possible is ideal, but you don’t want to accidentally overcook it). At that point, you will have a better idea of how your particular oven works, and can plan accordingly. Don’t worry if your turkey will be ready several hours before turkey time, I will address that later.
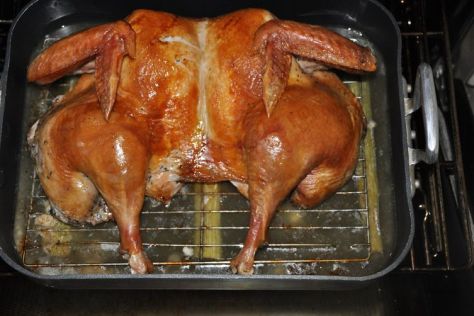
Now that all the rough planning is done, let’s get into it. Get your roasting pan out, and leave the roasting ‘rack’ behind. Don’t worry about greasing the bottom of the pan, or pouring in broth or water for moisture. Trust me, the turkey will make it’s own juices. You can put the bird straight in the pan dry, or you can create a bed of sliced onions, carrots, parsnips, potatoes, and other root vegetables that will increase the flavor and create a nice side dish to serve with the turkey after cooking. You can put the turkey in whole, or you can get fancy and ‘spatchcock’ it so it presents nicely. Spatchcocking is basically butterflying the turkey by cutting out the spine and cracking the hip and chest bone so it lays flat. This allows for a beautiful presentation, reduces the cooking time slightly, and allows for nicely crisped skin, as the entire ‘outside’ of the bird is now face-up, with the chest cavity face down in the pan. Since turkey is a bird, their bones are fairly lightweight; they can be spatchcocked with a basic pair of kitchen shears and a little muscle, don’t attack it with a cleaver or chef’s knife or you could lose a finger.
If you or any relatives like to eat the skin (it makes for moister chicken anyway), you can get it nice and crunchy (much better J )by covering the entire pan with foil until it reaches an internal temperature of about 120 oF, at which point you should remove the foil (but save for later) to allow the skin to brown at the end. Alternately, if any parts of the bird are starting to look burned, like the wing tips or drum sticks, wrap them in foil to locally slow down the cooking process.
This bit here is the secret to a completely cooked, yet moist bird. When the center of the breast reaches 158 oF to 160 oF, pull it out of the oven, put it somewhere safe on the counter so it doesn’t burn anything, then wrap the pan in foil and then cover the entire thing with multiple towels or blankets. Cooked food naturally retains it’s heat and continues to cook, even after you are done “cooking” it. This is why vegetables are often “blanched”. Insulating the turkey when it is at 160 oF out of the oven takes advantage of that natural process, resulting in a turkey that just hits 165 oF without going over into the dry cardboard mode. Even better, with the turkey covered, it can sit on the counter for several hours without having to be re-heated for serving. I pulled a 20 lb turkey out of the oven at 9:30 pm, and left it covered on my counter, and thought it was warm enough to eat the next morning when I got up at 5:30.
If you must carve the turkey early to make space, just part out the turkey into the breasts, legs, thighs, etc. without slicing it to help keep in the moisture. Leave the skin ON, even if you won’t eat it; the goal is for moist turkey, and the skin helps. I personally suggest saving the juice from the pan, and the carcass, which makes a great turkey broth/soup and gravy, but that’s a lesson for another day.
Well, that was a lot of reading, so I’ll summarize the process below, like all the fancy cooking blogs that share their recipes.
- Thaw your turkey several days early, and allow it to come to room temperature several hours early. A frozen turkey the morning of is a lost cause. No basting, no stuffing (cook separately).
- Preheat the oven to 325 oF.
- Calibrate your thermometer.
- Prepare your root vegetable bed in your roasting pan (optional).
- Put turkey in roasting pan (spatchcocking optional), season skin (optional) and cover with foil.
- Plan for 12-15 minutes per lb of turkey, do first temperature check at 1/3 – 1/2 of planned time.
- Remove foil at ~120 oF for crispy skin (reserve foil for later).
- Remove Turkey at 158-160 oF. Immediately wrap tightly in foil and multiple towels/blankets, keeping safety in mind so you don’t burn the place down.
- Turkey will remain hot enough to serve for several hours, carve as close to serving time as possible. If carving early, part out first, then slice before eating. Reheat/maintain heat in a chafing dish, with some water in bottom to maintain turkey moisture.